Case Study - Automating Let's Encrypt Wildcard Certificates with Cloudflare DNS and Full (Strict) TLS Encryption
Overview
This case study demonstrates how to implement Full (Strict) SSL/TLS encryption by combining Cloudflare's managed frontend certificates with Let's Encrypt wildcard certificates on your origin server. This architecture provides:
- End-to-end encryption from browser to origin server
- Wildcard coverage for unlimited subdomains with a single certificate
- Automatic renewal every 60-90 days with zero downtime
- Free SSL certificates with industry-standard security
- Cloudflare proxy protection (orange cloud) maintained
Why This Approach?
- Enhanced Security: Full (strict) mode ensures encrypted connections throughout the entire path
- Cost-Effective: Let's Encrypt certificates are free and auto-renew
- Scalability: One wildcard certificate covers all current and future subdomains
- Reliability: Cloudflare manages frontend certs while you control backend security
Architecture Overview
 1┌─────────┐           ┌────────────┐           ┌───────────────┐
 2│ Browser │           │ Cloudflare │           │ Origin Server │
 3└─────────┘           └────────────┘           └───────────────┘
 4https://virtualscale.dev
 5or your domain
 6     │                      │                         │
 7     │                      │                         │
 8     └─────HTTPS────────────┘                         │
 9        (TLS 1.3)                                     │
10     (Cloudflare Cert)                                │
11     Full (Strict) Mode                               │
12                            │                         │
13                            └──────HTTPS──────────────┘
14                               (TLS 1.2/1.3)
15                            (Let's Encrypt Cert)
16                            Auto-renews
17                            Validates Certificate
Key Points:
- Frontend: Cloudflare manages TLS certificates automatically
- Backend: Let's Encrypt ECDSA wildcard certificate (90-day validity, auto-renewal after 60 days)
- DNS Validation: Uses Cloudflare API for DNS-01 challenge (allows keeping orange cloud enabled)
Prerequisites
Before starting, ensure you have:
- Domain managed by Cloudflare DNS
- Nginx web server (or Apache)
- Root/sudo access to AlmaLinux server
- Cloudflare API token with DNS edit permissions
- Ports 80 and 443 allowed in firewall (see below)
Firewall Configuration
1# Allow HTTP (needed for initial setup and renewals)
2# Source: Server IP → Destination: ANY → Port: TCP 80 → Action: Allow
3
4# Allow HTTPS (production traffic)
5# Source: Server IP → Destination: ANY → Port: TCP 443 → Action: Allow
Step 1: Install EPEL Repository
EPEL (Extra Packages for Enterprise Linux) provides Certbot packages.
1# Check if EPEL is already installed
2sudo dnf repolist | grep epel
3
4# If no output, install EPEL
5sudo dnf install epel-release -y
Step 2: Install Certbot and Cloudflare DNS Plugin
What is Certbot?
Certbot is the official Let's Encrypt client that automates the entire certificate lifecycle:
- Requests certificates from Let's Encrypt's Certificate Authority (CA)
- Validates domain ownership using various challenge methods
- Installs certificates on your web server
- Renews certificates automatically before expiration
Think of Certbot as your automated certificate manager that handles all communication with Let's Encrypt's API.
For Nginx:
 1# Check for existing Certbot installation
 2rpm -qa | grep certbot
 3
 4# Install Certbot for Nginx
 5sudo dnf install certbot python3-certbot-nginx -y
 6
 7# Install Cloudflare DNS plugin (required for DNS-01 challenge)
 8sudo dnf install python3-certbot-dns-cloudflare -y
 9
10# Verify installation
11certbot --version
12certbot plugins
For Apache (Alternative):
 1# Install Certbot for Apache
 2sudo dnf install certbot python3-certbot-apache -y
 3
 4# Install Cloudflare DNS plugin
 5sudo dnf install python3-certbot-dns-cloudflare -y
 6
 7# Optional: Verify SSL module is loaded
 8sudo httpd -M | grep ssl_module
 9
10# If not present, install SSL module
11sudo dnf install -y mod_ssl
Note: Apache's default
ssl.confcan conflict with custom vhost configurations. Review and adjust as needed.
Step 3: Create Cloudflare API Token
The API token allows Certbot to create DNS records for domain validation.
Steps:
Go to Cloudflare Dashboard → My Profile → API Tokens
Click Create Token → Use Edit zone DNS template
Configure token:
- Token name:
api-token-tls-letsencrypt-webserver - Permissions:
Zone → DNS → Edit - Zone Resources:
Include → Specific zone → yourdomain.com - IP Filtering (optional): Add server's public IP for extra security
- TTL (optional): Set expiration if desired
- Token name:
Click Continue to summary → Create Token
Copy and save the token immediately (you won't see it again!)
Test Your Token
Verify the token works before proceeding:
1curl "https://api.cloudflare.com/client/v4/user/tokens/verify" \
2  -H "Authorization: Bearer YOUR_CLOUDFLARE_API_TOKEN"
Expected output should show "status": "active"
Step 4: Store Cloudflare Credentials Securely
Security Best Practice: Generate one API token per webserver for better access control.
1# Create secure directory
2sudo mkdir -p /root/.secrets
3
4# Create credentials file
5sudo vim /root/.secrets/cloudflare.ini
Add this content:
1# Cloudflare API Token for TLS/SSL Let's Encrypt
2dns_cloudflare_api_token = YOUR_CLOUDFLARE_API_TOKEN_HERE
Secure the file (critical step):
1# Set restrictive permissions (owner read/write only)
2sudo chmod 600 /root/.secrets/cloudflare.ini
3
4# Verify permissions (should show -rw-------)
5sudo ls -l /root/.secrets/cloudflare.ini
Step 5: Obtain Wildcard TLS Certificate
Understanding DNS-01 Challenge
What is DNS-01 Challenge?
DNS-01 is one of several domain validation methods Let's Encrypt uses to verify you control a domain. Unlike HTTP-01 (which requires port 80 access), DNS-01 validates ownership by checking for a specific DNS TXT record.
How DNS-01 Works:
 11. You request a certificate from Let's Encrypt
 2   ↓
 32. Let's Encrypt generates a unique challenge token
 4   ↓
 53. Certbot creates a TXT record: _acme-challenge.yourdomain.com
 6   ↓
 74. Let's Encrypt's servers query DNS for this TXT record
 8   ↓
 95. If the record exists with the correct token → Validation successful
10   ↓
116. Certificate is issued
12   ↓
137. Certbot automatically removes the TXT record (cleanup)
Why We Use DNS-01 for This Setup:
- Wildcard Support: DNS-01 is the only method that supports wildcard certificates (
*.domain.com) - Cloudflare Proxy Compatible: Works even with Cloudflare's orange cloud (proxy) enabled
- No Port Requirements: Doesn't need port 80/443 exposed to the internet
- Server Location Flexible: Works regardless of server location or firewall rules
How It Works with Let's Encrypt and Cloudflare
The Flow in Detail:
- Request: Certbot contacts Let's Encrypt API requesting a certificate for
*.yourdomain.com - Challenge: Let's Encrypt responds with a unique challenge string
- DNS Record Creation: Certbot uses the Cloudflare API (via your API token) to create:
1 _acme-challenge.yourdomain.com TXT "random_challenge_string"
- Propagation Wait: Certbot waits for DNS propagation (default 10s, we set it to 60s)
- Validation: Let's Encrypt queries public DNS servers to verify the TXT record exists
- Certificate Issuance: Upon successful validation, Let's Encrypt issues the certificate
- Cleanup: Certbot removes the temporary TXT record via Cloudflare API
Why This Requires a Cloudflare API Token:
Certbot needs programmatic access to create/delete DNS records in your Cloudflare account during the validation process. The API token provides secure, limited access specifically for DNS editing.
Request the Certificate
This step requests the certificate using DNS-01 validation.
 1# Verify Certbot location
 2which certbot
 3# Expected: /usr/bin/certbot
 4
 5# Request wildcard certificate with ECDSA encryption
 6sudo certbot certonly \
 7  --dns-cloudflare \
 8  --dns-cloudflare-credentials /root/.secrets/cloudflare.ini \
 9  --key-type ecdsa \
10  --elliptic-curve secp256r1 \
11  -d '*.virtualscale.dev' \
12  -d virtualscale.dev
What happens during this process:
- Certbot creates temporary TXT records in Cloudflare DNS (
_acme-challenge.yourdomain.com) - Let's Encrypt verifies domain ownership via DNS
- Wildcard certificate is issued (valid for 90 days)
- TXT records are automatically cleaned up
- Certificate files are saved to
/etc/letsencrypt/live/yourdomain/
Verify Certificate Installation
1# List certificate files
2sudo ls -la /etc/letsencrypt/live/virtualscale.dev/
3
4# Expected output:
5# cert.pem -> ../../archive/virtualscale.dev/cert1.pem
6# chain.pem -> ../../archive/virtualscale.dev/chain1.pem
7# fullchain.pem -> ../../archive/virtualscale.dev/fullchain1.pem
8# privkey.pem -> ../../archive/virtualscale.dev/privkey1.pem
Check Certificate Details
1# View certificate information
2sudo certbot certificates
3
4# Or check from the server itself
5openssl s_client -connect localhost:443 2>/dev/null | \
6  openssl x509 -noout -text -dates -issuer -subject
Key Certificate Details:
- Issuer: Let's Encrypt (E7)
- Validity: 90 days
- Algorithm: ECDSA with SHA-384
- Key Size: 256-bit (P-256 curve)
- Coverage:
*.virtualscale.devandvirtualscale.dev
Step 6: Install and Configure Nginx
Install Nginx
1sudo dnf install nginx -y
2sudo systemctl start nginx
3sudo systemctl enable nginx
4sudo systemctl status nginx
Create Basic Webpage
1# Create web root directory
2sudo mkdir -p /var/www/virtualscale.dev/html
3
4# Create index page
5sudo vim /var/www/virtualscale.dev/html/index.html
 1<!DOCTYPE html>
 2<html lang="en">
 3<head>
 4    <meta charset="UTF-8">
 5    <meta name="viewport" content="width=device-width, initial-scale=1.0">
 6    <title>VirtualScale.dev</title>
 7    <style>
 8        body { font-family: Arial, sans-serif; max-width: 800px; margin: 50px auto; padding: 20px; }
 9        h1 { color: #2c3e50; }
10        .secure { color: #27ae60; font-weight: bold; }
11    </style>
12</head>
13<body>
14    <h1>Welcome to VirtualScale.dev</h1>
15    <p class="secure">🔒 Secured with Let's Encrypt SSL</p>
16    <p>This site uses <strong>ECDSA (Elliptic Curve Digital Signature Algorithm)</strong>
17       with SHA-384 hashing for enhanced security.</p>
18    <p><small>ECDSA provides strong security with smaller key sizes compared to traditional RSA encryption.</small></p>
19</body>
20</html>
Configure Nginx for TLS
1sudo vim /etc/nginx/conf.d/virtualscale.dev.conf
 1# Redirect all HTTP traffic to HTTPS
 2server {
 3    listen 80;
 4    listen [::]:80;
 5    server_name virtualscale.dev www.virtualscale.dev;
 6
 7    # 301 permanent redirect
 8    return 301 https://$server_name$request_uri;
 9}
10
11# HTTPS server with Let's Encrypt certificate
12server {
13    listen 443 ssl;
14    listen [::]:443 ssl;
15    http2 on;
16
17    server_name virtualscale.dev www.virtualscale.dev;
18
19    root /var/www/virtualscale.dev/html;
20    index index.html;
21
22    # SSL Certificate Configuration (Let's Encrypt)
23    ssl_certificate /etc/letsencrypt/live/virtualscale.dev/fullchain.pem;
24    ssl_certificate_key /etc/letsencrypt/live/virtualscale.dev/privkey.pem;
25
26    # Modern SSL Configuration (Security Best Practices)
27    ssl_protocols TLSv1.2 TLSv1.3;
28    ssl_ciphers ECDHE-ECDSA-AES128-GCM-SHA256:ECDHE-RSA-AES128-GCM-SHA256:ECDHE-ECDSA-AES256-GCM-SHA384:ECDHE-RSA-AES256-GCM-SHA384;
29    ssl_prefer_server_ciphers off;
30
31    # Enable HSTS (forces HTTPS for 2 years)
32    add_header Strict-Transport-Security "max-age=63072000" always;
33
34    # Additional security headers (optional but recommended)
35    add_header X-Frame-Options "SAMEORIGIN" always;
36    add_header X-Content-Type-Options "nosniff" always;
37    add_header X-XSS-Protection "1; mode=block" always;
38
39    location / {
40        try_files $uri $uri/ =404;
41    }
42}
Test and Apply Configuration
 1# Test configuration for syntax errors
 2sudo nginx -t
 3
 4# If test passes, restart Nginx
 5sudo systemctl restart nginx
 6
 7# Verify Nginx is running
 8sudo systemctl status nginx
 9
10# Check listening ports
11sudo ss -tlnp | grep -E ':(80|443)'
Step 7: Set Up Automatic Certificate Renewal
How Auto-Renewal Works
Let's Encrypt certificates expire after 90 days for security reasons. Certbot handles automatic renewal through a systemd timer.
The Auto-Renewal Process:
 1Every 12 hours, the certbot-renew.timer triggers:
 2   ↓
 31. Certbot checks all installed certificates
 4   ↓
 52. If certificate expires in < 30 days → Renewal triggered
 6   ↓
 73. Same DNS-01 challenge process runs automatically:
 8   - Create TXT record via Cloudflare API
 9   - Let's Encrypt validates
10   - New certificate issued
11   - Old TXT record removed
12   ↓
134. Deploy hooks run (reload Nginx)
14   ↓
155. Your server now uses the new certificate (seamless!)
Key Points:
- Renewal Window: Starts attempting renewal at 60 days (30 days before expiry)
- Retry Logic: If renewal fails, it retries automatically on the next scheduled run
- Zero Downtime: Nginx reload takes milliseconds; users don't notice
- No Manual Intervention: Fully automated as long as Cloudflare API token remains valid
Timeline Example:
1Day 0:   Certificate issued (valid for 90 days)
2Day 60:  First renewal attempt
3Day 61:  If Day 60 failed, retry
4Day 62:  If Day 61 failed, retry
5...
6Day 89:  Final renewal attempts (1 day before expiry)
7Day 90:  Certificate expires (if all renewals failed - rare!)
Enable Auto-Renewal Timer
1# Enable timer to start on boot
2sudo systemctl enable certbot-renew.timer
3
4# Start timer immediately
5sudo systemctl start certbot-renew.timer
6
7# Verify timer status
8sudo systemctl status certbot-renew.timer
Configure Nginx Reload After Renewal
Why This Is Needed:
When Certbot renews a certificate, it writes new certificate files to disk, but Nginx is still using the old certificates loaded in memory. The deploy hook ensures Nginx reloads and starts using the new certificates immediately after renewal.
Without the hook: New certificates sit unused until you manually restart Nginx
With the hook: Nginx automatically picks up new certificates within seconds
Create a deploy hook to automatically reload Nginx when certificates renew:
1# Create deploy hooks directory
2sudo mkdir -p /etc/letsencrypt/renewal-hooks/deploy
3
4# Create reload script
5sudo vim /etc/letsencrypt/renewal-hooks/deploy/reload-nginx.sh
1#!/bin/bash
2# Reload Nginx after Let's Encrypt certificate renewal
3# This ensures the web server uses the newly renewed SSL certificates
4
5systemctl reload nginx
1# Make script executable
2sudo chmod +x /etc/letsencrypt/renewal-hooks/deploy/reload-nginx.sh
Test Auto-Renewal (Dry Run)
1# Perform dry run (doesn't actually renew, just tests the process)
2sudo certbot renew --dry-run
If successful, you should see: Congratulations, all simulated renewals succeeded
Step 8: Increase DNS Propagation Timeout (Optional but Recommended)
Prevents timeout failures during renewal by allowing more time for DNS changes to propagate.
1# Edit renewal configuration
2sudo vim /etc/letsencrypt/renewal/virtualscale.dev.conf
3
4# Add this line in the [renewalparams] section:
5dns_cloudflare_propagation_seconds = 60
Verify the change:
1grep "propagation" /etc/letsencrypt/renewal/virtualscale.dev.conf
Expected output:
1dns_cloudflare_propagation_seconds = 60
Troubleshooting
Check Logs
1# View Certbot logs
2sudo tail -n 100 /var/log/letsencrypt/letsencrypt.log
3
4# View renewal service logs
5sudo journalctl -u certbot-renew.service -n 200
6
7# View Nginx error logs
8sudo tail -n 50 /var/log/nginx/error.log
Common Issues
Issue: DNS validation timeout
Solution: Increase dns_cloudflare_propagation_seconds to 60 or 120
Issue: Permission denied accessing Cloudflare credentials
Solution: Verify file permissions are 600 and owned by root
Issue: Nginx won't start after renewal
Solution: Check for syntax errors with sudo nginx -t
Issue: Certificate not covering subdomain
Solution: Verify both *.domain.com and domain.com are in certificate
Verification and Testing
Verify SSL Certificate
1# Check certificate on local server
2openssl s_client -connect localhost:443 2>/dev/null | \
3  openssl x509 -noout -dates -issuer -subject
4
5# Expected output should show:
6# - Issuer: Let's Encrypt
7# - Subject: CN=*.virtualscale.dev
8# - Valid dates (90 days from issue)
Test External Access
- Visit your domain in a browser:
https://virtualscale.dev - Check certificate details (click lock icon in address bar)
- Verify:
- Certificate issuer: Let's Encrypt
- Encryption: TLS 1.3 (if supported by browser)
- Connection: Secure
Visual Confirmation: Successful TLS Implementation
Once configured correctly, your browser will display a secure connection indicator. Here's what a successful implementation looks like:
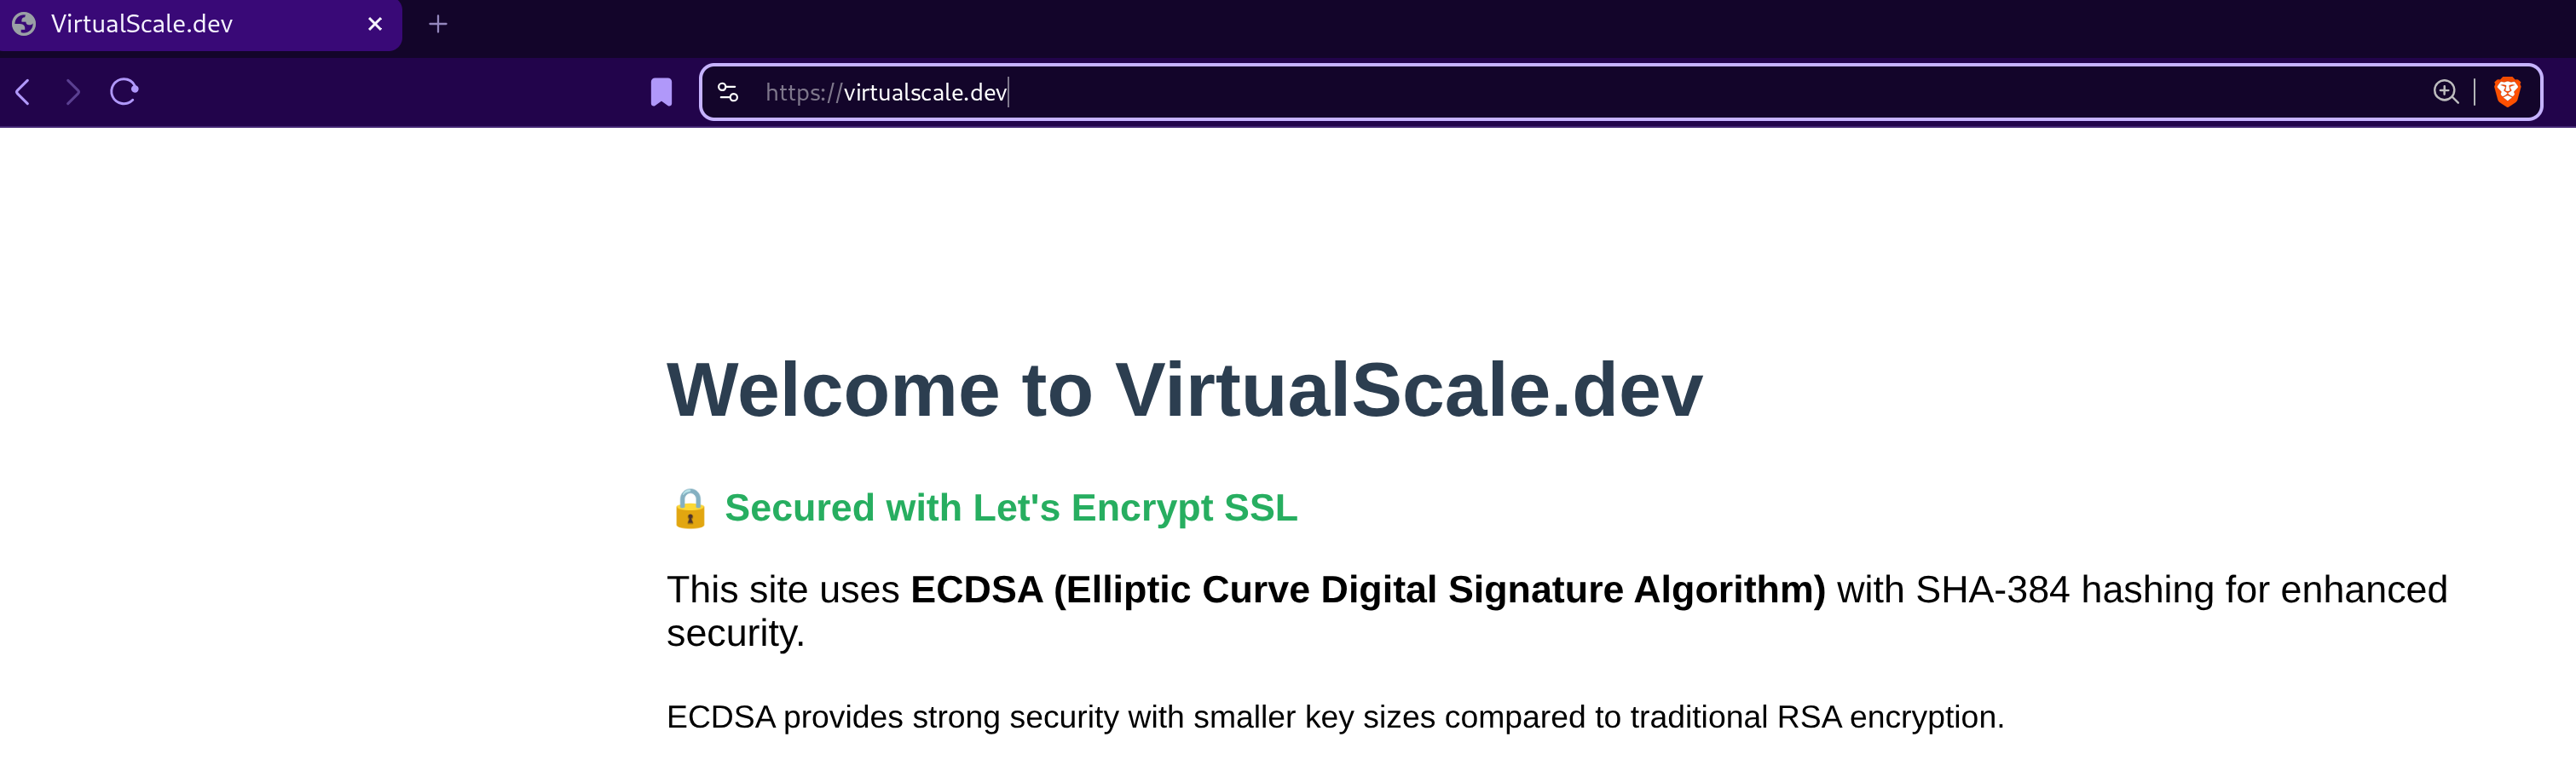
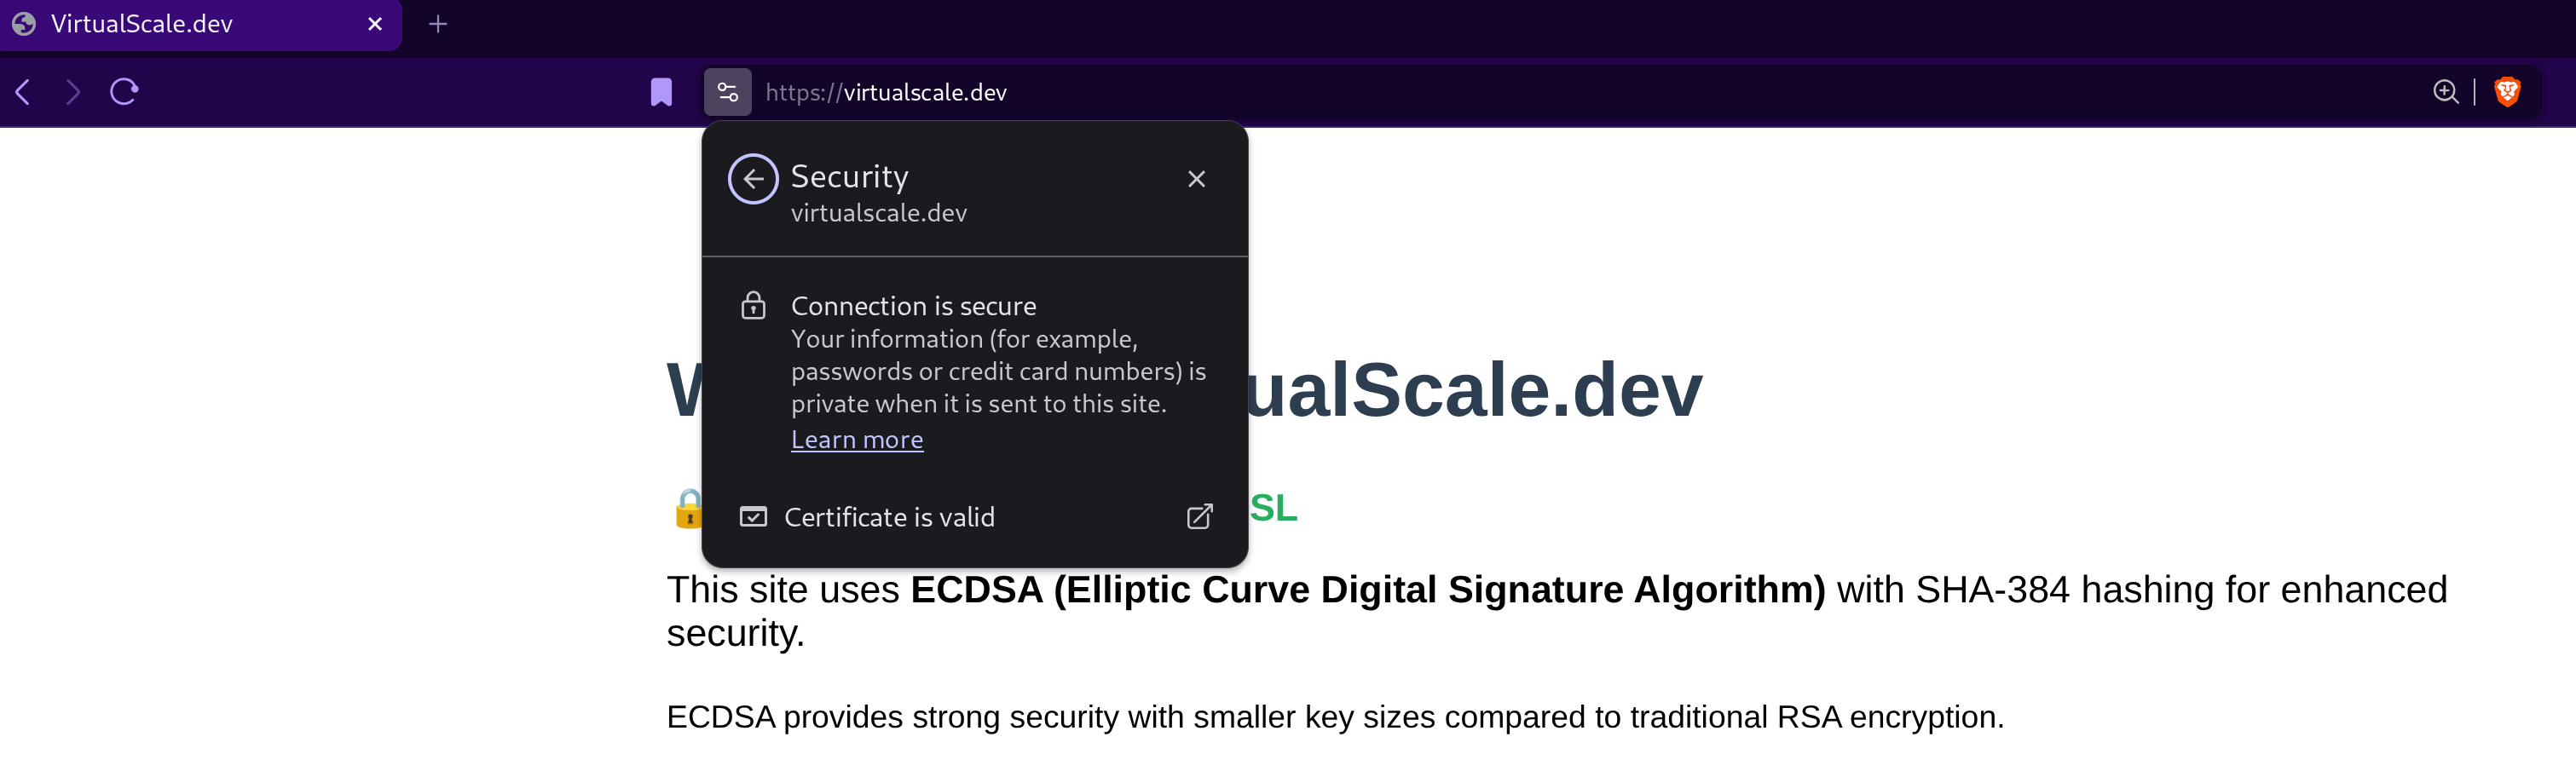
What to look for in the browser:
- Padlock icon in the address bar (indicates HTTPS)
- "Connection is secure" message in certificate viewer
- "Certificate is valid" status
- No browser warnings about insecure connections
This confirms your Let's Encrypt certificate is properly installed, trusted by browsers, and providing end-to-end encryption with Cloudflare's Full (strict) SSL/TLS mode.
Test Auto-Renewal
1# Force renewal (for testing only - has rate limits!)
2sudo certbot renew --force-renewal
3
4# Better: Use dry run
5sudo certbot renew --dry-run
Security Benefits Summary
End-to-End Encryption: Full (strict) mode ensures TLS encryption from browser to origin
Modern Cryptography: ECDSA provides strong security with smaller key sizes
Automatic Updates: Certificates renew automatically before expiration
Wildcard Coverage: One certificate secures all subdomains
Zero Downtime: Renewal happens in background without service interruption
Cloudflare Protection: Maintains DDoS protection and CDN benefits
Free Solution: No certificate costs while maintaining enterprise-grade security
Key Takeaways
- Architecture: Cloudflare handles frontend certificates, Let's Encrypt secures origin server
- Validation Method: DNS-01 challenge allows wildcard certificates with Cloudflare proxy enabled
- Automation: Systemd timer + deploy hooks ensure hands-off operation
- Security: Full (strict) TLS mode provides maximum encryption throughout the connection
- Scalability: Wildcard certificates eliminate the need for per-subdomain certificate management
Additional Resources
- Let's Encrypt Documentation
- Cloudflare TLS Full Strict Mode Documentation
- Certbot Documentation
- Nginx SSL Configuration Generator
If this helped you, follow me on LinkedIn for more DevOps & cloud articles.
If you’re implementing something similar and want to discuss real-world tradeoffs, feel free to DM me on LinkedIn.