Building a simple REST API in Golang with MUX, PostgreSQL and Docker
Overview
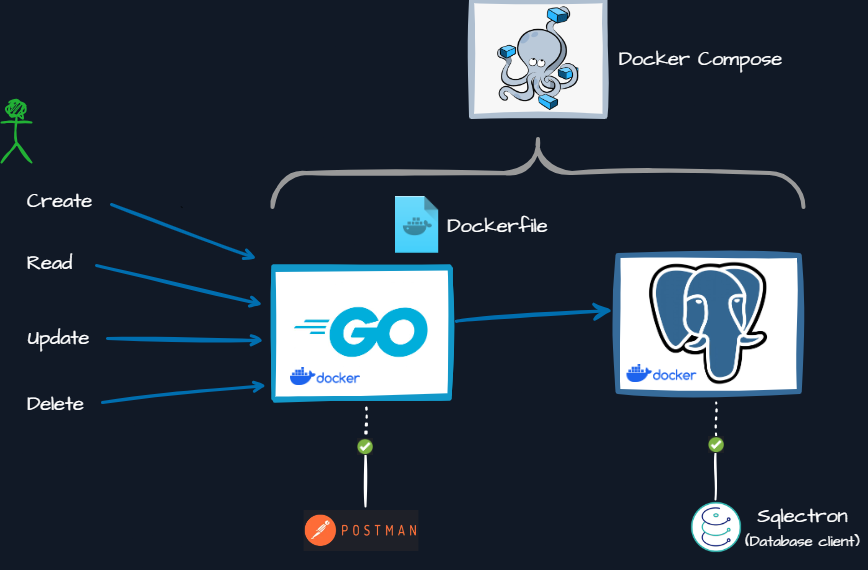
This project demonstrates building a basic REST API in Golang, implementing CRUD operations with a PostgreSQL database for data persistence. The application utilises Gorilla Mux for routing, PostgreSQL for the database, and Docker for containerisation.
The API manages user information, including name, email, and city.
Note: This demo does not include an user interface as it has not been built for the purpose of this demo. The code for this demo is available on GitHub.
Pre-requisites/Assumptions:
- Download and Install GO on your local machine.
- Download and Install Docker Desktop.
- Use your preferred IDE (e.g. Visual Studio Code).
- Download and Install Postman Desktop Agent to test the API locally.
- Use a PostgreSQL desktop/terminal client (e.g. Sqlectron).
Architecture/Design Overview

Setting up the environment
Clone the repository:
1git clone https://github.com/Mik3asg/Rest-API-Golang-Mux-PostgreSQL-Docker.gitNavigate to the project directory:
1cd Rest-API-Golang-Mux-PostgreSQL-DockerDependencies:
This project uses Go modules for dependency management. The necessary dependencies, including Gorilla Mux for handling HTTP routing and pq for PostgreSQL database interaction, are already included in the go.mod and go.sum files.
These dependencies were initially installed using the following commands:
1go mod init api  # Initializes a GO module named 'api' for dependency management
2go get github.com/gorilla/mux  # Installs Gorilla Mux for handling HTTP routing in Go
3go get github.com/lib/pq  # Installs pq, PostgreSQL driver for Go's database/sql package
However, users do not need to run these commands themselves, as the dependencies are already included in the project. Simply clone the repository and ensure you have Go installed on your machine. If you're not familiar with Go modules, you can learn more about them here.
- Run Docker Engine on your local machine
Setting up PostgreSQL Authentication
To configure authentication for the PostgreSQL database used in this project, you need to set up environment variables in a .env file. Follow these steps:
Create a new file named
.envin the root directory of your project.Open the
.envfile in a text editor and add the following lines:1POSTGRES_USER=your_postgres_username 2POSTGRES_PASSWORD=your_postgres_password 3POSTGRES_DB=your_database_nameReplace
your_postgres_username,your_postgres_password, andyour_database_namewith your actual PostgreSQL credentials.Save the
.envfile in the same directory as yourdocker-compose.ymlfile, and Docker Compose will automatically read these environment variables when you rundocker-compose up.
These environment variables will be read by Docker Compose and used to authenticate your application with the PostgreSQL database.
Start the PostgreSQL Database Container
Run the following command to start the PostgreSQL database service (go-db) defined in the docker-compose.yml file. The -d flag runs the container in detached mode, allowing it to run in the background.
1docker compose up -d go-db
Build and Run the custom CRUD GO API
These commands build the custom Go application defined in the docker-compose.yml file and then run it using Docker Compose.
1docker compose build  # Build the custom Go app
2docker compose up go-app  # Run the custom Go app
Validate the setup
Run the following commands:
1docker images  # Check the status of Docker images for go-db and go-app
2docker ps  # Check the status of running Docker containers for go-db and go-app
Test API endpoints
Once the application is running, you can access it in your web browser at http://localhost:8080 . We will use Postman as an API Platform to test our API endpoints.
In addition, we can use a PostgreSQL client to check the data being stored in the database for each endpoint. Please refer to your database credentials defined in your .env file.
Create User with POST
- Endpoint:
POST localhost:8000/users - To create a new user, send a POST request to
localhost:8000/userswith a JSON body containing the user details. - Use a PostgreSQL client to verify the new user data was inserted into the database.
GET All Users
- Endpoint:
GET localhost:8000/users - To get all existing users, send a GET request to
localhost:8000/users. - The response will contain a JSON array of all users.
- Check the PostgreSQL client to verify the user data being returned.
GET Single User
- Endpoint:
GET localhost:8000/users/<id> - To get a specific user, send a GET request to
localhost:8000/users/<id>where<id>is the id of the desired user. - Check the PostgreSQL client that the correct user data is being returned based on the id.
PUT Update User
- Endpoint:
PUT localhost:8000/users/<id> - To update a user, send a PUT request to
localhost:8000/users/<id>where<id>is the id of the user to update. - Use the PostgreSQL client to verify the user data was updated in the database.
DELETE User
- Endpoint:
DELETE localhost:8000/users/<id> - To delete a user, send a DELETE request to
localhost:8000/users/<id>where<id>is the id of the user to delete. - Check the PostgreSQL client that the user was removed from the database.
Error Handling
- Invalid Endpoint:
GET/PUT/DELETE localhost:8000/users/<invalid_id> - If an invalid
<id>is provided in the endpoint for GET, PUT or DELETE requests, the API will return a 404 status with the message "User not found". - The PostgreSQL client will show that no data was changed.