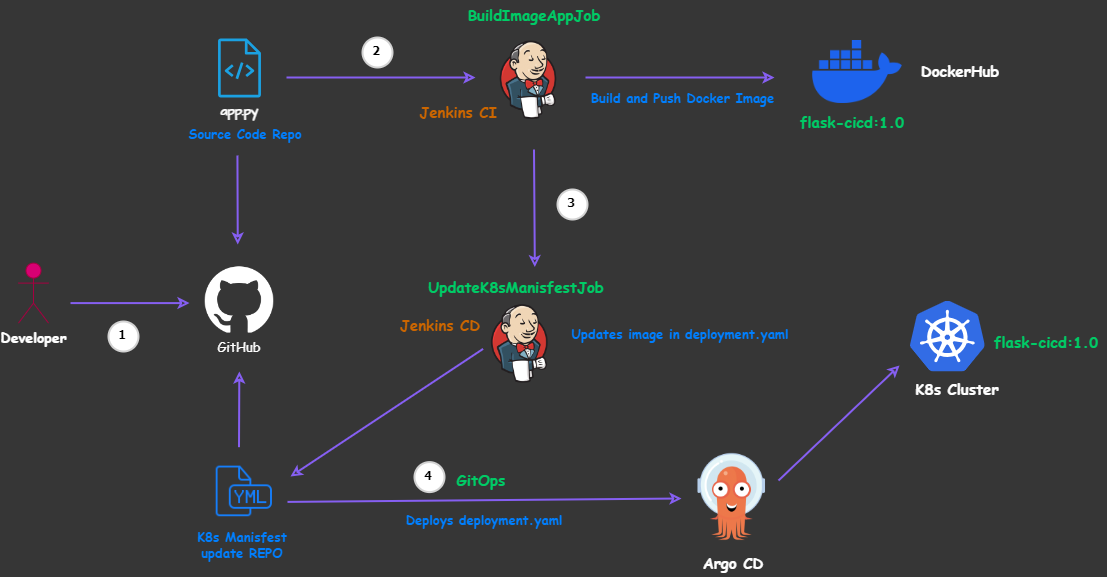
Flask App deployment into Amazon EKS, using CICD Pipeline with Jenkins and Argo CD
Overview
This project showcases an end-to-end DevOps pipeline for deploying a basic Flask application using Jenkins Pipeline and GitOps (with ArgoCD) on an Amazon Elastic Kubernetes Service (EKS) cluster. It utilises two Git repositories:
- GitHub Repository for Continous Integration hosting our basic Flask application code
- GitHub Repository for GitOps and Update of K8s Manifest
Pre-requisites/Assumptions:
- AWS Account created
- AWS CLI installed on local machine
- IAM user set up with AWS access key ID and AWS secret access key
- kubectl installed on local machine
- DockerHub Account created
- Application code hosted on GIT Repository
Architecture/Design Overview
Installation and Setup
1. Spin up an AWS EC2 instance for a Jenkins server:
Specs:
| Instance Type | OS | Storage | SG I/O Rules |
|---|---|---|---|
| t3.small | Ubuntu | 15 GiB gp2 | TCP/22, TCP/8080 |
SSH into your EC2 instance to install Jenkins and Docker packages.
Use the
user-datasection within the EC2 Console to incorporate the following bash script for installing Java, Jenkins, and Docker packages:Specs:
- Instance Type:
t3.small - OS:
Ubuntu - Storage:
15 GiB gp2 - SG Inbound rules:
TCP/22, TCP/8080
- Instance Type:
SSH into your EC2 instance to install Jenkins and Docker packages.
Use the
user-datasection within the EC2 Console to incorporate the following bash script for installing Java, Jenkins, and Docker packages:- Warning: Java 11 support in Jenkins ends after Sep 30, 2024. Installing an unsupported Java version may cause Jenkins to fail. Upgrade Java to a newer version. Refer to the documentation for details.
 1#!/bin/bash
 2
 3# Update and upgrade the system
 4sudo apt update && sudo apt upgrade -y
 5
 6# Install Java
 7sudo apt install -y openjdk-11-jre
 8
 9# Install Jenkins
10curl -fsSL https://pkg.jenkins.io/debian/jenkins.io-2023.key | sudo gpg --dearmor -o /usr/share/keyrings/jenkins-keyring.gpg
11echo deb [signed-by=/usr/share/keyrings/jenkins-keyring.gpg] https://pkg.jenkins.io/debian binary/ | sudo tee /etc/apt/sources.list.d/jenkins.list > /dev/null
12sudo apt-get update
13sudo apt-get install -y jenkins
14
15# Install Docker
16sudo apt install -y docker.io
17
18# Grant Jenkins user permission to Docker daemon
19sudo usermod -aG docker jenkins
20sudo systemctl enable docker
21sudo systemctl restart docker
SSH into your Jenkins EC2 instance and check status of packages by running the following commands:
java -versionsudo systemctl status jenkinssudo systemctl status docker
2. Configure Jenkins
- Install the necessary plugins by navigating to
Manage Jenkins > Plugins > Available Plugins - Choose
Docker,Docker PipelineandGitHub integration - Restart Jenkins server
- Configure Credentials:
Manage Jenkins > Credentials > Global > Add Credentials- for GitHub (
id=github, username=your_username, password=token_generated_in_GitHub) - for DockerHub (
id=dockerhub, username=your_username, password=your_dockerhub_pwd)
- for GitHub (
- Create 2 Jenkins Jobs:
- For CI Pipeline:
New Item > Name=BuildAppJob > Pipeline- Build Triggers=
GitHub hook trigger for GITScm polling - Navigate to the GitHub repository settings and enable the Webhook by following these steps:
Settings > Webhook > Payload URL=http://jenkins_server_public_ip:8080/github-weebhook/)Content type=application/json.- Confirm Add webhook
- Pipeline Definition=
Pipeline script from SCM- SCM=
GIT - Script Path=
Jenkinsfile - Repository URL=
https://github.com/Mik3asg/Flask_App_Jenkins_CI_EKS.git - Credentials=
none - Branch Specifier=
*/main
- SCM=
- Build Triggers=
- For CD Pipeline:
New Item > Name=UpdateK8sManifestJob > Pipeline- Select
This project is parameterized - String Parameter: Name=
DOCKERTAG, Default Value=latest - Pipeline Definition=
Pipeline script from SCM- SCM=
GIT - Script Path:
Jenkinsfile - Repo URL=
https://github.com/Mik3asg/Flask_App_Jenkins_GitOps_EKS.git - Credentials=
none# public repo - Branch Specifier=
*/main
- SCM=
- Select
- For CI Pipeline:
3. Provision AWS EKS Ckuster, through AWS CLI
Access your AWS Account via
aws configurein the Terminal of your local machineProvide the credentials of your IAM user (access key ID and secret key) and region
Note: For consistency, use the same region in which you have created your previous EC2 instance for Jenkins server, i.e. us-east-1
Create an AWS EKS Cluster
1eksctl create cluster --name <flask-eks> --region us-east-1 --nodegroup-name <my-nodes> --node-type t3.small --managed --nodes 2 # Replace <flask-eks> and <my-nodes> with your desired values
- Check the status of EKS Cluster (if up and running)
1eksctl get cluster --name demo-eks --region us-east-1
- Run
kubectl get nodescommand to verify the status of the nodes
4. Installation and Configuration of Argo CD
- Via CLI:
- Follow steps provided in the official Argo CD Documentation to:
Install Argo CD via CLI
Connect to the API server from local machine and access to UI using
https://localhost:8080Note: Keep the
kubectl port-forwardingterminal open to avoid disrupting access to the UI. Open a new terminal if you need CLI access.Retrieve Password for UI access
- Follow steps provided in the official Argo CD Documentation to:
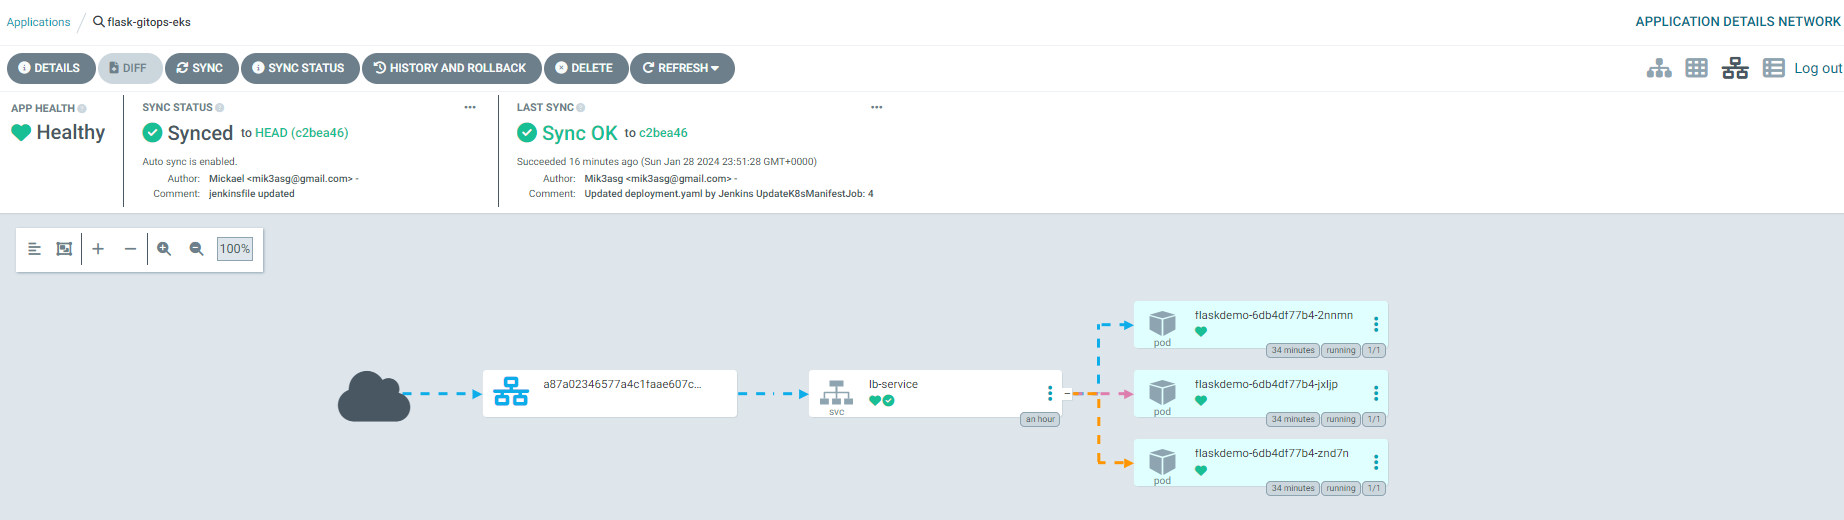
- In UI:
- Application Name=
flask-gitops-demo - Project Name=
Default - SYNC POLICY=
Automatic - REPO URL:
<Github_repo_hosting_CD_Pipeline> - Path:
./ - Cluster URL=
https://kubernetes.default.svc - Namespace=
default
- Application Name=
5. Commit a new code change and test app deployment
- Check status in Jenkins UI of both Jobs:
BuildAppJobfor CI Pipeline andUpdateK8sManifestJobfor CD Pipeline - Check status of pods:
kubectl get pods - Check status in Argo CD UI
- Retrieve load balancer endpoint by running
kubectl get svc, then paste into web browser to access the web application
Clean-up resources
Delete AWS EKS Cluster
1eksctl delete cluster --name flask-eks --region us-east-1 #Replace <flask-eks> with the value you defined for your cluster
Terminate the running EC2 instance for Jenkins server in AWS Console Management
If an article saved you time or helped you solve a problem, buying me a coffee is a great way to show your support — and keeps me motivated to write more.

Found this useful? Follow the blog to stay informed on new posts — it's free. Have questions or want to discuss further? Leave a comment below.
